 Getting Started
Welcome to VistaSculpt 1.2.7! This guide covers every feature, tool, setting, and workflow in the application. Whether you're a first-time user or an experienced maker, you'll find everything you need to create stunning 3D models from images, sculpt with precision, and export production-ready files.
What is VistaSculpt?
VistaSculpt is a state-of-the-art application that transforms 2D images into 3D relief models with unmatched depth precision and detail accuracy, and can now generate full 3D models from a single photo. A "relief" is a type of sculpture where the design is raised from a flat background - think of coins, carved wood panels, or decorative plaques. VistaSculpt uses advanced AI technology to analyze your photos and automatically create detailed 3D versions that you can:
- 3D Print - Create physical objects on any 3D printer (FDM, resin, etc.)
- CNC Machine - Carve into wood, aluminum, brass, or other materials
- Laser Engrave - Etch detailed designs onto wood, acrylic, leather, and more
- Use in Digital Projects - Import into games, renders, AR/VR applications, or other 3D software
- Create Molds - Generate negative molds for casting and manufacturing
Why VistaSculpt Stands Out
VistaSculpt delivers industry-leading depth accuracy that other relief software simply cannot match. Our advanced AI understands the true structure of your images, solving common problems that plague other solutions:
Precise Boundary Detection
When your image contains a frame, picture, or bordered element, VistaSculpt correctly interprets the spatial relationship. The subject inside a frame stays inside the frame in your 3D relief. Other software often causes subjects to incorrectly "pop out" beyond their boundaries, ruining the depth logic.
Original Image
 VistaSculpt
Other Software
Intelligent Shadow Handling
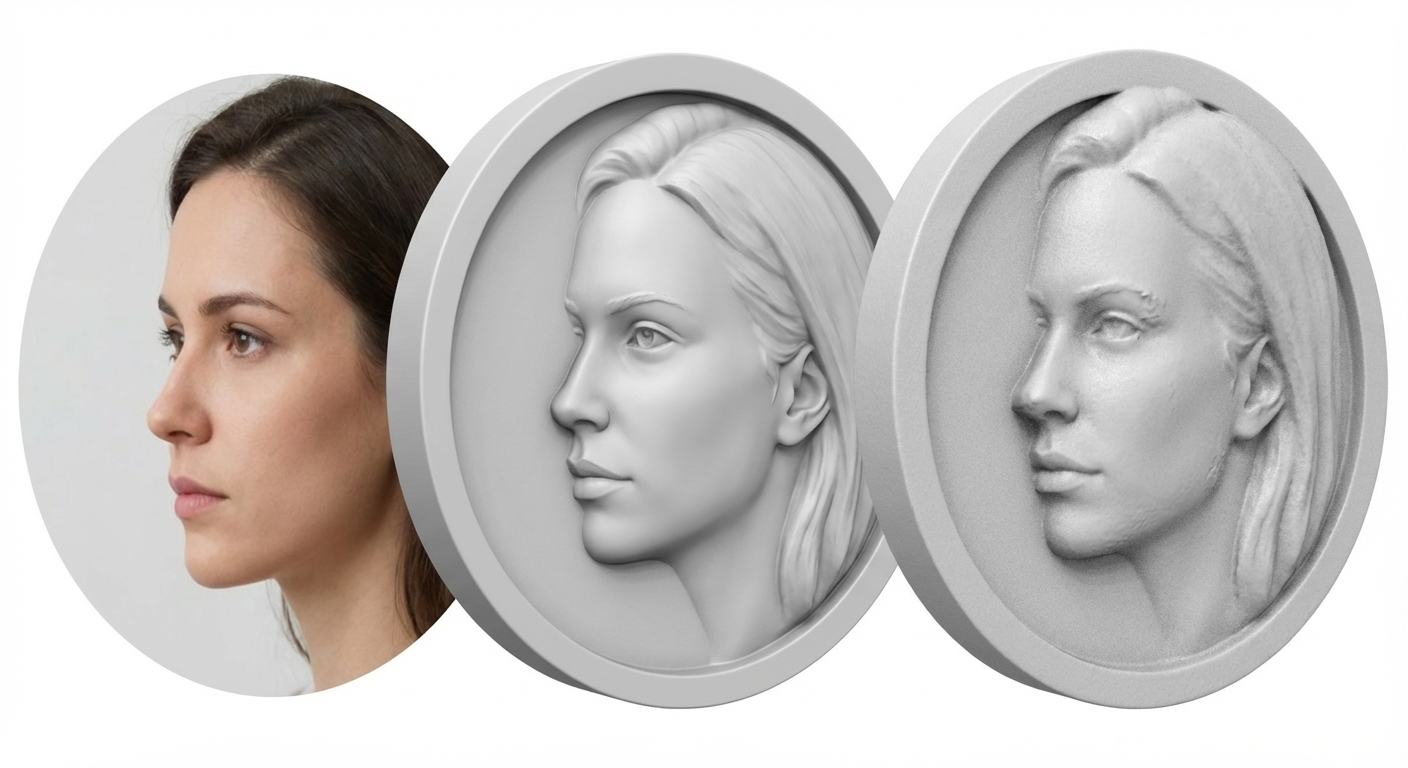
Traditional software misinterprets shadows as recessed areas, creating unwanted holes or noise. VistaSculpt's AI recognizes shadows for what they are - lighting effects, not depth information - producing clean, artifact-free surfaces.
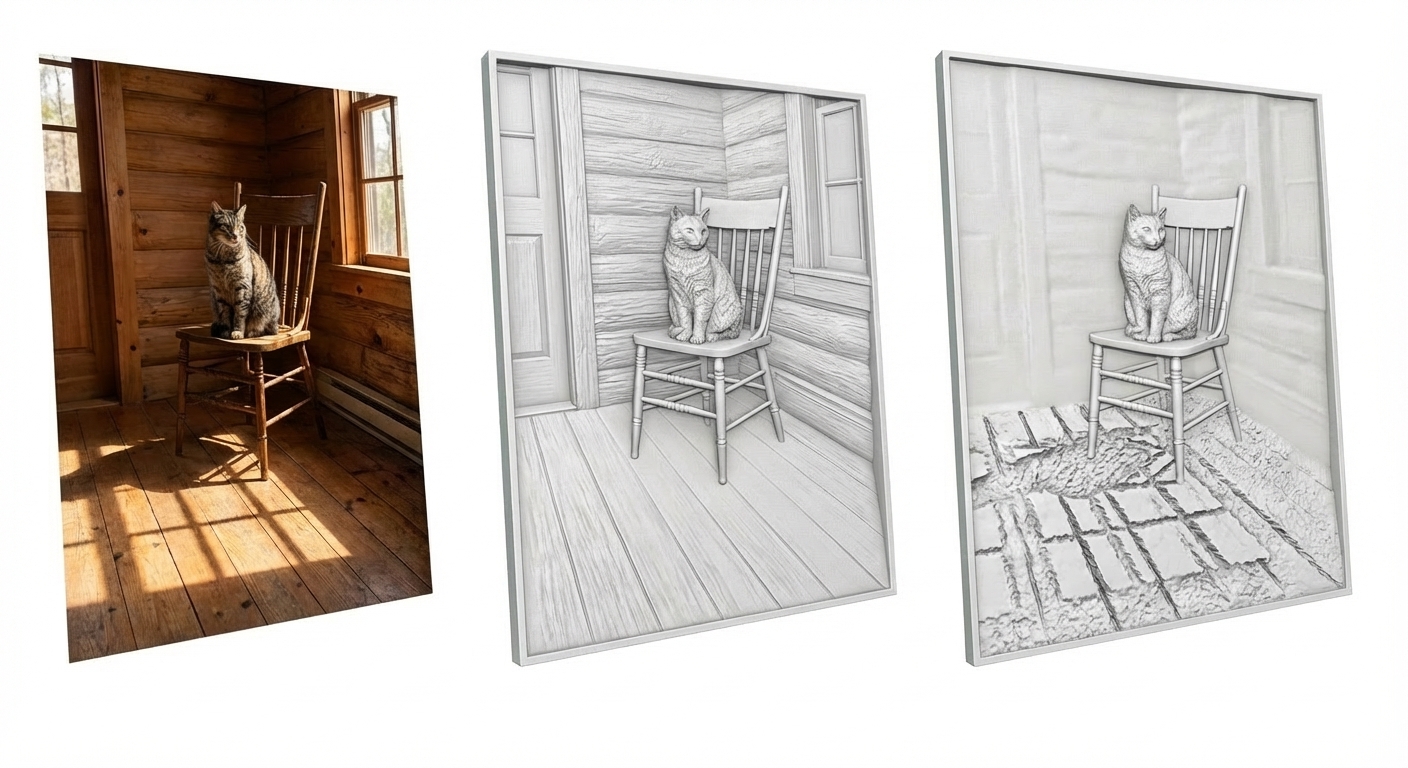
Original Image
VistaSculpt
Other Software
Precision Flat Surface Detection
VistaSculpt's AI detects flat areas with 99.9% accuracy, ensuring surfaces meant to be flat remain perfectly flat in your relief. Critical for architectural subjects, product photography, and clean surface work.
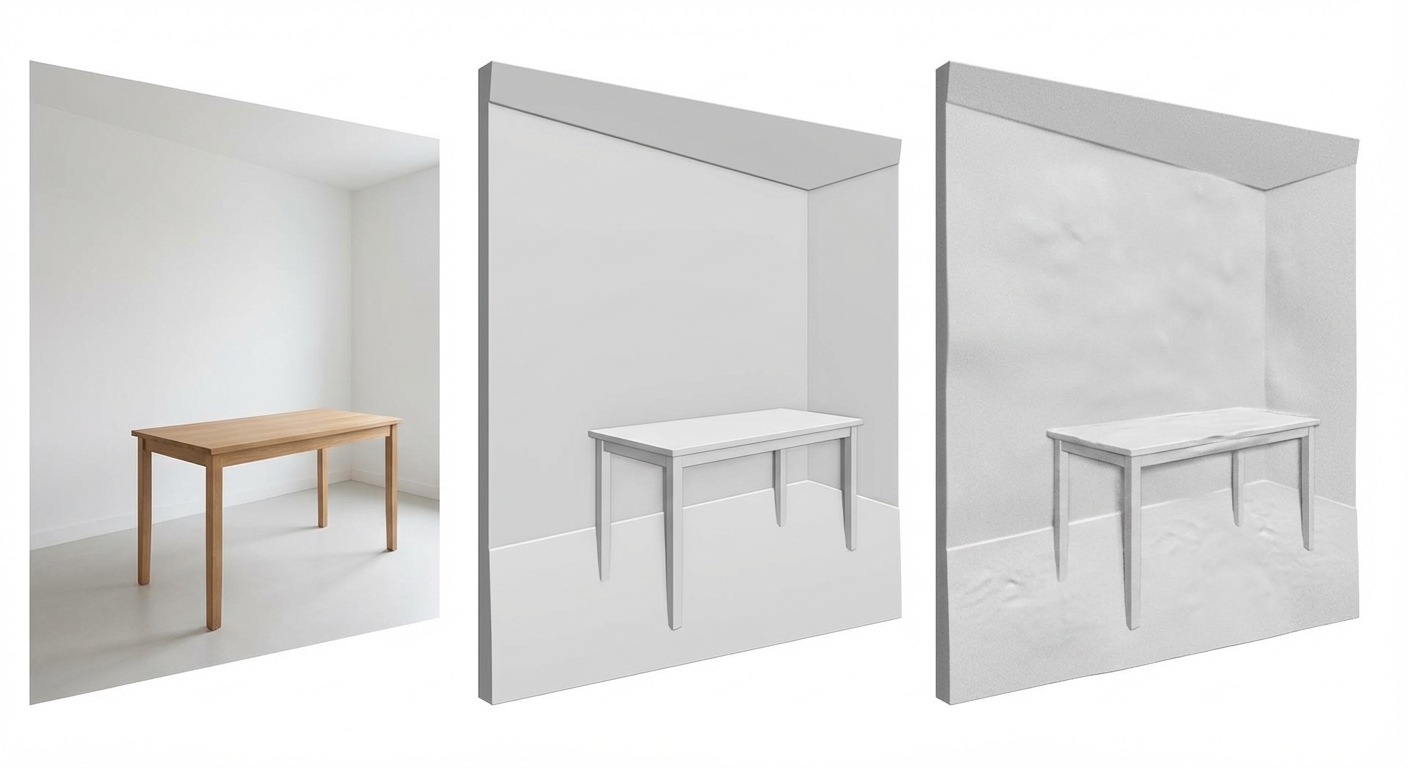
Original Image
VistaSculpt
Other Software
What's New in v1.2.7
- AI Agent (Beta) - A built-in assistant that not only knows every feature but can operate the app for you from a chat: load or generate images, expand and enhance them, adjust the relief sliders, run Generate and review the live preview, apply modelling tools (crop, frame, solidify, depth optimization, smoothing, bend, mold, and more), sculpt with AI, create shapes and text, generate textures, position and merge models, and export. It also answers "how do I…?", licensing and troubleshooting questions. See the AI Agent section.
- Boolean Tool - New modelling tool that carves a second model's exact shape out of the selected one where they overlap (a real CSG difference). The two models are not merged and the selected model keeps its size — only the overlap is cut, and the second model stays separate and untouched. Position the second model into the target live with the gizmo, then Apply. "Crop With Offset" now lives in a hover submenu on the Crop button to make room.
What's New in v1.2.6
- Wrap Surface Tool - New modelling tool to wrap a second model onto the surface of another. Live preview as you transform with gizmos or spinboxes, two relief modes (high relief and bass relief), real-time Z offset, and a flat-engrave option that ignores the base curvature. Bass relief routes through a depth-map carving pipeline so the engrave preserves full geometry detail (capped at the user's global mesh-resolution limit).
What's New in v1.2.2
- Image to 3D - Generate full textured 3D models from a single photo
- Shape Creator - Full CAD-style vector shape drawing with 20 extrusion profiles, text shapes, and engrave mode
- AI Textures & PBR Materials - Generate seamless textures and PBR materials from text prompts
- Mask Brush - New sculpting brush to protect areas from editing
- Create Mold - Generate negative molds for manufacturing
- Cut Model (Remove Plane) - Slice the model with a cutting plane
- Free Crop Tool - Draw freeform crop/split boundaries
- Directional Bend - Per-side dome/dish control
- Measurement Tool - Interactive distance measurement in the viewport
- Custom Frame Drawing - Draw your own frame outlines
- Transform Gizmo - Blender-style Move (G), Rotate (R), Scale (S) controls
- Free Background Removal - Now runs locally at no credit cost
- Expanded Export - Added PLY, 3MF, DAE (Collada), Normal Map, TIFF-16, BMP-8, and SCU depth map formats
- AI Brush Textures - Generate custom sculpting brush textures from text descriptions
- Material Settings - Full control over shading, ambient occlusion, wireframe overlay, glossiness
- Drag & Drop - Drop files directly onto the application
- 25+ Languages - Expanded multilingual support
Quick Start Workflow
- Load Your Image - Drag and drop any image onto the application, or click "Load Image" to browse. Supported: JPG, PNG, WEBP, TIFF, BMP.
- Choose Your Mode - Select from Image to Relief, Image to 2D Vector, 3D to Relief, or Image to 3D.
- Prepare Your Image (Optional) - Click "Edit Image" to enhance quality or expand cropped photos.
- Configure Settings - Adjust Depth Scale, Details Scale, and Quality in the right panel.
- Generate the 3D Model - Click "Generate" and wait for processing.
- Refine (Optional) - Use Sculpting, Shape Creator, or AI textures.
- Apply Advanced Tools (Optional) - Solidify, Frame, Depth Optimization, Create Mold, and more.
- Export - STL, OBJ, GLB, PLY, 3MF, DAE, Depth Map, SVG, DXF, Normal Map.
 Pro Tip: Image Quality Matters
For best results, use images that are at least 1000x1000 pixels, well-lit with visible shadows, and have the subject clearly in focus. Portrait photos with natural lighting typically produce excellent reliefs.
Pro Tip: Image Quality Matters
For best results, use images that are at least 1000x1000 pixels, well-lit with visible shadows, and have the subject clearly in focus. Portrait photos with natural lighting typically produce excellent reliefs.
 AI Agent New in 1.2.7
The AI Agent is a built-in assistant (currently in Beta) you talk to from the "AI Agent" panel on the right. Unlike a plain help chat, it can actually drive the application for you: it sees the app, moves the controls, runs the tools and checks the result - so you describe what you want in plain language and let it do the clicking. It works in your language.
What it can do
- Prepare images - load a photo or generate one from a text prompt, expand cropped edges, enhance quality, remove the background.
- Create the relief or 3D model - pick the mode, set Depth, Details, Z-Limit, smoothing and outline rounding, run Generate, and inspect the live preview from the side before confirming.
- Apply modelling tools - crop, frame, solidify, depth optimization, smooth outline, bend, mold, cut plane, height curve, wrap surface and more.
- Sculpt and detail - AI sculpting edits, shape and text creation, and AI textures.
- Compose and export - position, align and merge multiple models, then export in the format you need.
- Answer questions - explain any feature, "how do I…?" steps, licensing, credits and troubleshooting.
Works in the background
The agent can keep working while VistaSculpt is behind other windows - it captures the app off-screen without stealing focus. Since it is in Beta it can make mistakes, so review important results before exporting.
Creation Modes
VistaSculpt offers four different modes depending on what you want to create. Select your mode from the dropdown menu at the top of the right panel before loading your file.
Most Popular
Image to Relief
The primary mode. Uses AI depth estimation to analyze your 2D photo and convert it into a 3D relief model with realistic depth.
How It Works
The AI examines your image to understand spatial relationships - it recognizes that a nose protrudes from a face, that foreground objects should be higher than background elements, and interprets how light and shadow indicate surface shape.
Best Image Types
- Portraits - Human faces, pets, character busts
- Animals - Wildlife, pets, animal sculptures
- Sculptures & Statues - Existing 3D artwork photographed from the front
- Products - Coins, medallions, decorative objects
- Nature - Flowers, trees, landscapes with clear depth
- Artwork - Paintings, drawings with shading that suggests depth
Best For: Any photograph where you want to create a 3D raised surface. Works especially well with portraits, animals, and subjects with clear foreground/background separation.
 Image to 2D Vectors
Extracts lines and shapes from your image as vector paths (SVG/DXF format). Produces toolpaths for CNC machines and laser engravers.
Vector Style Options
- Center Line - Single line through the center of each shape. Use for: V-carving, single-pass laser engraving, handwriting outlines.
- Outline - Traces inner and outer edges, creating closed contour paths. Use for: Laser cutting, multi-pass engravings, profile cutting.
Best For: Logos, text, line drawings, silhouettes, icons. Works best with high-contrast images.
 3D Model to Relief
Import existing 3D files (STL, OBJ, or GLB) and convert them into optimized relief sculptures with a flat back.
Key Features
- Free Rotation - Position the model at any angle using X/Y/Z sliders or click-and-drag
- Automatic Back Flattening - Creates a flat back surface for mounting or printing
- AI Detail Texture - Optional AI-generated detail maps for enhanced surface quality
- Mesh Optimization - Cleans and optimizes geometry
- Polygon Control - Adjust output resolution to balance detail vs. file size
Best For: Converting 3D characters into medallions, coin designs from 3D scans, optimizing 3D files for CNC.
New in 1.2.2
 Image to 3D
Generate a full 360-degree 3D model from a single 2D photograph. Unlike Image to Relief which creates a flat-backed relief, this mode produces a complete 3D object viewable from all angles.
Output Types
- Geometry Only - 3D mesh without texture. No additional credit cost. Best for sculpting or relief conversion.
- Texture + PBR - Fully textured mesh with PBR materials (albedo, normal, roughness maps). Costs 6 credits.
Smart Caching
Results are cached. If you generate the same image again, it loads instantly without using credits.
Best For: Creating full 3D models of products, characters, animals from a single photo. Ideal for game assets, AR/VR, 3D printing figurines.
 3D Relief Generation
These settings control how your image or 3D model is converted into a relief. They apply to both Image to Relief and 3D Model to Relief modes.
-
 Depth Scale Range: 0-20, Default: 3
Controls the overall "height" of your relief.
Value Guide
- 0-2 (Very Low) - Extremely subtle, almost flat.
- 3-5 (Low) - Subtle, coin-like relief. Default range.
- 6-10 (Medium) - Noticeable depth. Recommended for most portraits.
- 11-15 (High) - Dramatic, pronounced relief.
- 16-20 (Very High) - Extreme depth. Use with caution.
-
 Details Scale Range: 0-100, Default: 50
Controls surface texture intensity - pores, fabric weave, hair strands, wrinkles. Works independently from Depth Scale.
Value Guide
- 0-20 - Smooth, marble-like surfaces
- 21-40 - Subtle detail, idealized look
- 41-60 - Balanced (default)
- 61-80 - Enhanced detail, realistic
- 81-100 - Maximum texture (fur, scales, rough stone)
-
 Z Limit (Floor Cut) Range: 0-100, Default: 0
Clips the top portion of the model by setting a height ceiling. Everything above the threshold is flattened. Only enabled when Depth Scale is greater than 0.
-
 Smoothing Surface: 0-100 | Edge: 0-100
Surface Smoothing reduces noise and creates cleaner transitions.  Edge Smoothing blends the sharp outline where the relief meets the background. Auto Mode (default) calculates values based on Details Scale.
-
Quality Preset
- Standard - Balanced quality for previewing and general use.
- High - Default, production quality. Recommended for most final outputs.
- Ultra Pro - Maximum detail. Requires 7.5GB+ RAM.
-
Remove Background
Uses AI segmentation to isolate the subject and remove the image background before relief generation. Runs locally at no credit cost. When enabled, two additional outline controls appear:
- Outline Round Width Range: 0-100, Default: 0 - Controls how far inward from the outline edge the rounding effect extends. Higher values create a wider transition zone.
- Outline Round Intensity Range: 0-100, Default: 5 - Controls the strength of the rounding/bevel applied to the outline edge. Creates softer, rounder borders where the subject meets the background.
-
AI Texture on Relief Pro
Automatically paints an AI-generated color texture onto the relief after generation. Adds 3 credits to the cost.
2D Vector Generation
The Image to 2D Vectors mode extracts lines and shapes from your image as vector paths, producing toolpaths ready for CNC machines and laser engravers. Exported as SVG or DXF format.
Vector Style Options
-
Center Line
Traces a single line through the center of each shape. Produces a single continuous path following the midline of strokes and edges.
Best For: V-carving, single-pass laser engraving, handwriting outlines, pen plotter output.
-
Outline
Traces inner and outer edges of each shape, creating closed contour paths. Produces paired paths that define the boundary of every element.
Best For: Laser cutting, multi-pass engravings, profile cutting, stencil creation.
Workflow
- Select Mode - Choose "Image to 2D Vectors" from the mode dropdown at the top of the right panel.
- Load an Image - Load or drag and drop a high-contrast image (logos, text, line drawings, silhouettes work best).
- Choose Style - Select Center Line or Outline depending on your output needs.
- Generate - Click "Export 2D Vectors." Costs 3 credits per generation.
- Export - Download as SVG (for Lightburn, LaserGRBL) or DXF (for AutoCAD, Vectric V-Carve, Fusion 360).
Tips for Best Results
- Use high-contrast images with clear edges (black on white, or simple colors)
- Logos, text, icons, and silhouettes produce the cleanest vector paths
- Avoid photographs with gradients - use Image to Relief for those instead
- Clean up noisy images with the Enhance Image tool first
- For complex designs, consider using Remove Background to isolate the subject
Vector Library
VistaSculpt includes a built-in library of pre-made line art designs (File → Vector Library). Browse and load ready-to-use vector templates for common motifs and patterns.
3D Model Generation New in 1.2.2
The Image to 3D mode produces a complete, full-360-degree 3D model from a single photograph. The AI reconstructs both visible and hidden sides of your subject, generating up to 1,500,000 triangles.
Workflow
- Load an Image - Select "Image to 3D" from the mode dropdown, then load your photo.
- Choose Output Type - "Geometry Only" (free) or "Texture + PBR" (6 credits).
- Generate - Click "Generate 3D Model." Processing takes approximately 7 minutes.
- Post-Processing - VistaSculpt automatically cleans the mesh: removes non-manifold geometry, fills holes, fixes face orientation, optimizes topology.
- Use Your Model - Sculpt it, apply textures, convert to relief, or export directly.
Output Types
| Type | Credits | Includes | Best For |
|---|
| Geometry Only | 0 | Clean mesh, no texture | Sculpting, relief conversion, 3D printing |
| Texture + PBR | 6 | Albedo, normal, roughness, metallic maps | Rendering, AR/VR, game assets, Sketchfab |
Smart Caching
- Level 1 (Exact Match) - Same image + same settings = instant load, no credits used.
- Level 2 (Raw Cache) - Same image, different settings = only local remeshing is repeated.
Tips for Best Results
- Use a clean, uncluttered background
- Subject should occupy most of the frame
- Good lighting with minimal harsh shadows
- Clearly defined shapes work best (figurines, products, animals)
- Symmetrical subjects produce more accurate reconstructions
 Sculpting Tools
Click "Sculpting" to enter manual editing mode. All edits happen in real-time with GPU-accelerated rendering.
Entering Sculpt Mode
VistaSculpt optimizes the mesh for real-time editing (remeshing to a watertight shell). This may take a few seconds.
Essential Sculpt Shortcuts
F + Drag Mouse Adjust brush size
S + Drag Mouse Adjust brush strength
Ctrl + Click/Drag Invert brush effect
Shift + Click/Drag Temporarily activate Smooth
Ctrl + Z Undo
Ctrl + Y Redo
Brush Types
| Brush | Shortcut | How It Works | Best Used For |
|---|
| Draw | X | Primary brush. Moves vertices up or down. Supports Dynamic Radius mode. Hold Ctrl to invert. | Adding volume, building up features, carving recesses |
| Smooth | Shift | Averages nearby vertices, blending sharp edges and reducing noise. | Fixing rough areas, blending strokes, polishing surfaces |
| Pinch | P | Pulls vertices toward center, tightening creases. Hold Ctrl to spread. | Sharpening eyelids, lip edges, clothing folds, ridges |
| Flatten | C | Forces all vertices to an average height plane. | Flat backgrounds, hard-surface details, fixing uneven areas |
| Deform (Grab) | G | Grabs and moves entire regions. Supports axis locking (X, Y, Z). | Adjusting proportions, repositioning features, correcting asymmetry |
| Texture | N | Five patterns: Standard (fractal), Spikes (sand), Pits (craters), Canvas (weave), Gravel (Voronoi). Adjustable rotation and repetitions. | Skin pores, stone texture, weathering, organic surfaces |
| Mask New | M | Paints protective mask. Masked areas are shielded from all brushes. Add/Subtract modes. "Clear All Mask" to remove. | Protecting finished areas, isolating regions, preserving detail |
Brush Settings
- Brush Size - Radius. Hold F + drag or use slider. Each brush remembers its own size.
- Brush Strength - Intensity. Hold S + drag or use slider. Each brush remembers its own strength.
- Auto Smooth - Automatically smooths after each stroke (Draw, Pinch, Flatten, Deform, Textures).
- Dynamic Radius - For Draw brush: auto-adjusts size based on camera distance.
- Normal Radius - Area used to calculate surface normals for brush direction.
- Texture Rotation / Repetitions - For Noise brush: rotate and tile the pattern.
- Add / Subtract Toggle - Switches between adding and removing material.
AI Brush Textures New
Generate custom brush textures from text descriptions to use with the Texture brush. Two generation modes:
- Single - Generates a centered object texture (e.g., "dragon scale", "leaf imprint", "paw print")
- Tiling - Generates a seamless repeating pattern (e.g., "brick wall", "chainmail", "woven fabric")
Costs 3 credits per generation. Generated textures are loaded directly into the Texture brush and can be applied by painting on the surface. Adjust Texture Rotation and Texture Repetitions to control how the pattern appears.
Remesh (Increase Detail) New
The Remesh button appears at the bottom of the sculpting brush panel. It subdivides the mesh to increase its polygon count, giving you finer control when sculpting. This is especially important for the Texture brush, where low polygon counts produce blocky, staircase-like artifacts instead of smooth texture patterns.
How It Works
- Click "Remesh (Increase Detail)" - A dialog appears showing your current polygon count and a slider to choose a new target.
- Choose target polygons - The slider defaults to double your current count. For smooth, detailed sculpting results, aim for at least 2-3 million polygons.
- The mesh is rebuilt - VistaSculpt captures a depth snapshot of your model and reconstructs it as a uniform grid mesh with evenly distributed polygons. This replaces irregular triangle shapes with a clean, regular topology optimized for sculpting.
Why Remesh Matters
- Texture brush quality - The Texture brush displaces individual vertices. With too few vertices, patterns like "skin pores" or "stone texture" become crude staircases instead of smooth, detailed surfaces. More polygons = finer texture resolution.
- Draw brush precision - Higher polygon density means smoother strokes and finer control when adding or carving details.
- Even topology - Remeshing replaces stretched or irregular triangles with uniform geometry, preventing sculpting artifacts in areas with poor mesh quality.
Limits
- The maximum polygon count is capped by your Mesh Resolution setting (Settings menu).
- The button is automatically disabled when the mesh is already at or near (95%) the maximum resolution.
- If you enter sculpt mode with fewer than 500,000 polygons, VistaSculpt automatically prompts you to remesh first.
Remesh replaces mesh topology
Remeshing rebuilds the entire mesh as a regular grid. The original connectivity is discarded. This is normal and produces better sculpting results, but you should save your project before remeshing if you want to preserve the original topology.
Mesh Resolution (Global Setting)
Access via Settings → Mesh Resolution. This global setting controls the maximum polygon count used throughout VistaSculpt - for relief generation, importing, merging, sculpt remeshing, mold creation, and export.
How It Works
- A single slider controls the target polygon count, from a minimum of 500,000 up to a maximum determined by your system's available RAM.
- The default is set to 75% of your system's maximum.
- All mesh operations throughout VistaSculpt are capped at this value - no operation will exceed it.
RAM-Based Limits
| System RAM | Maximum Polygons | Default (75%) |
|---|
| 4 GB or less | 2,000,000 | 1,500,000 |
| 6 GB | 3,000,000 | 2,250,000 |
| 7 GB | 4,000,000 | 3,000,000 |
| 11 GB | 5,000,000 | 3,750,000 |
| 15 GB | 7,000,000 | 5,250,000 |
| 16 GB | 8,000,000 | 6,000,000 |
| 24 GB | 10,000,000 | 7,500,000 |
| 30 GB | 14,000,000 | 10,500,000 |
| 30 GB+ | 20,000,000 | 15,000,000 |
Higher isn't always better
Very high polygon counts require more RAM and slow down sculpting, export, and generation. Choose a resolution that balances detail quality with your system's performance. For most users, 3-6 million polygons provides excellent results.
Sculpting Tips for Beginners
- Start with low strength (10-30%) - Build up gradually.
- Use large brushes first - General form first, then fine details.
- Smooth frequently - Hold Shift often. Secret to professional results.
- Work in passes - Major shapes, then details, then final smoothing.
- Use the Mask brush - Protect finished areas before working on adjacent regions.
- Rotate your view - Problems often visible only from certain angles.
- Use Undo liberally - Ctrl+Z (up to 300 undo steps).
- Save before major changes - Return to a known good state if needed.
Textures & Materials New in 1.2.2
VistaSculpt 1.2.2 introduces a comprehensive model texture and material system. Paint AI-generated color textures onto your 3D models, upload your own images, apply displacement maps, or use full PBR materials. This section covers the model surface appearance system - for sculpting brush (Texture brush patterns), see the Sculpting Tools section.
Model Texture Control Panel
Access the texture panel by clicking the texture button on a selected model. The panel provides two tabs for applying visual surface textures to your 3D model:
Recently Used Textures
The texture panel maintains a history of recently used textures per model, allowing you to quickly switch between previously applied textures without regenerating them.
Material Settings
Access via Settings → Material Settings to control the overall visual appearance of all models in the viewport:
- Model Colors - Default and selected model colors via color picker
- Shininess (0-100) - Controls specular highlight intensity
- Glossiness (1-128) - Controls the tightness/spread of specular highlights
- Shading Mode - Switch between Flat (faceted, shows individual polygons) and Smooth (interpolated normals, smooth surface appearance)
- Ambient Occlusion (SSAO) - Screen Space Ambient Occlusion adds realistic contact shadows in crevices and between surfaces. Configurable radius, bias, and kernel size.
- Wireframe Overlay - Toggle wireframe mesh visualization on top of the solid model
- Scene Background Color - Customize the viewport background
PBR Material Support
Models generated via Image to 3D with the "Texture + PBR" output type include full physically-based rendering material data:
- Albedo / Base Color - The surface color map
- Normal Map - Surface detail and micro-geometry for realistic lighting
- Roughness Map - Controls matte vs. glossy appearance per pixel
- Metallic Map - Defines which areas are metallic vs. dielectric
- Occlusion Map - Pre-baked ambient occlusion for additional depth
PBR materials are preserved when exporting to GLB/GLTF formats. Textures are also supported when exporting to OBJ and DAE formats, making them suitable for use in game engines (Unity, Unreal), web viewers (Sketchfab), and AR/VR applications.
Advanced Modeling Tools
Powerful tools for operations on your entire model. Found in the left panel as icon buttons.
 Scene Management & Export
Working with Multiple Objects
- Select - Click in list or viewport. Shift for multi-select. Ctrl + A select all.
- Copy / Paste - Ctrl + C / Ctrl + V
- Transform - Move (G), Rotate (R), Scale (S) with gizmos
- Show/Hide - Eye icon or H. Hidden objects are not exported.
- Delete / Rename / Duplicate / Mirror - Via context menu or shortcuts
- Merge - Ctrl + J
Transform Gizmo New
- Move (G) - 3-axis translation with color-coded arrows
- Rotate (R) - 3-axis rotation rings
- Scale (S) - 3-axis scaling with dimensional readout (Length/Height/Thickness)
- Lock Proportions - Maintain proportional scaling
- Quick Actions - Reset Scale, Reset Position, Center Model, Auto Orient
Viewport Controls
- Depth View (Ctrl + D) - Grayscale depth visualization Pro
- Toggle Wireframe (Ctrl + W)
- Toggle Bounding Box (Ctrl + B) - With dimension labels
- Toggle Grid (Ctrl + G) - Parametric grid with major/minor lines
- Perspective / Orthographic toggle
- Light Controls - Three-point lighting (key, fill, rim)
- Measurement Tool New - Click two points to measure distance. Multiple measurements supported.
- Reference Images New - Import overlay images with position, rotation, scale, opacity controls.
File Operations
- New / Load / Save (Ctrl + S) / Save As - VSW project files
- Import Model - STL, OBJ, PLY, GLB
- Import Height Map New - PNG, JPG, BMP, TIFF, WEBP, SCU
- Vector Library - Pre-made line art designs
- Recent Files - Last 5 projects
- Drag & Drop New - Drop files directly onto the application
Export Formats
3D Mesh Formats
| Format | Texture | Best For | Details |
|---|
| STL | No | 3D Printing, CNC | Universal geometry format. Cura, PrusaSlicer, Fusion 360, Vectric. |
| OBJ | Yes (UV + texture) | Rendering, Digital Art | Textures, quad topology. Blender, Maya, ZBrush. |
| GLB/GLTF | Yes (UV + PBR) | Web, AR/VR, Games | Embedded textures and PBR materials. Unity, Unreal, Sketchfab. |
| PLY | No | Research, Point Clouds | Quad topology support. 3D scanning workflows. |
| 3MF New | Vertex colors | 3D Printing | Modern 3D printing standard. Color support. Cura, PrusaSlicer, Bambu Studio. |
| DAE (Collada) New | Yes (UV + texture) | 3D Interchange | Open standard. Blender, SketchUp, Unity, Unreal. Good for cross-tool workflows. |
Depth Map & Vector Formats
| Format | Best For | Details |
|---|
| PNG-16 Depth Map | CNC Micro-Machining | 16-bit grayscale (65,536 shades). 2048px resolution. |
| TIFF-16 Depth Map | Professional CNC | 16-bit TIFF. Industry standard. 2048px. |
| BMP-8 Depth Map | Legacy CNC | 8-bit depth map (256 shades). 2048px. |
| SCU-8 Depth Map | Specialized CNC | Proprietary depth format. 1024px. |
| Normal Map | Game Engines | PNG normal map for surface detail without extra polygons. |
| SVG | Laser Cutting | Vector paths. Lightburn, LaserGRBL. Scalable. |
| DXF | CNC Routing, CAD | AutoCAD, Vectric V-Carve, Fusion 360 CAM. |
Export Options
- Include Texture - For OBJ, GLB, and DAE exports.
- Close Bottom (Make Solid) New - Flat base for watertight 3D printing. Default on for reliefs.
- Quad Topology - For OBJ/PLY, output quads instead of triangles.
- Scale - Physical dimensions in mm or inches.
- Export Perimeter Vectors - SVG/DXF outline paths (right-click context menu).
 Keyboard Shortcuts
General
| Shortcut | Action |
|---|
| Ctrl + S | Save project |
| Ctrl + A | Select all models |
| Ctrl + C | Copy selected |
| Ctrl + V | Paste |
| Ctrl + J | Merge selected |
| Ctrl + Z | Undo |
| Ctrl + Y | Redo |
| H | Toggle visibility |
| Escape | Cancel / Exit mode |
Transform Gizmo
| Shortcut | Action |
|---|
| G | Move gizmo |
| R | Rotate gizmo |
| S | Scale gizmo |
Viewport
| Shortcut | Action |
|---|
| Ctrl + D | Toggle Depth View (Pro) |
| Ctrl + W | Toggle Wireframe |
| Ctrl + B | Toggle Bounding Box |
| Ctrl + G | Toggle Grid |
Sculpting Mode (Hold)
| Shortcut | Action |
|---|
| X | Draw brush |
| Shift | Smooth brush |
| P | Pinch brush |
| C | Flatten brush |
| G | Deform (Grab) brush |
| N | Texture brush |
| M | Mask brush |
| F + Drag | Adjust brush size |
| S + Drag | Adjust brush strength |
| Ctrl + Click | Invert brush effect |
| Ctrl + Scroll | Adjust brush size (alt) |
 Credits & Generation Limits
Relief Generation Limits
| License Type | Generations per 5 Hours | Extra Generations |
|---|
| Pro | 5 | 5 credits per additional generation |
| Hobby | 3 | Upgrade to Pro for extras |
| Demo / Expired | 2 per 24 hours | Purchase license |
Re-generating Doesn't Count!
Adjusting sliders and regenerating the same image reuses cached depth data. Only processing a new image uses a generation slot.
Credit Costs
Credits are only deducted on successful completion. Failed or cancelled operations keep your credits.
| Feature | Cost | Description |
|---|
| Enhance Image | 2 | AI upscaling with facial reconstruction |
| Expand Image | 2 | AI generative fill to extend edges |
| AI Texture Generation | 2 | Seamless tileable textures from text |
| Generate Image (Standard 1024x1024) | 2 | AI depth map from text prompt |
| Generate Image (High Res) | 3 | AI image at 1536x1024 or 1024x1536 |
| Generate 2D Vectors | 3 | Line art conversion with path optimization |
| AI Relief Preview (Sculptify) | 3 | AI depth for flat artwork (free daily allowance) |
| AI Relief Enhancer | 3 | AI enhancement of 3D model details |
| Context-Aware AI Texture New | 3 | PBR texture based on model shape |
| AI Brush Texture New | 3 | Custom sculpting brush textures from text |
| AI Texture on Relief New | 3 | Auto-paint texture during generation |
| Export Edited Image | 5 | Full-resolution 2D image with enhancements |
| Image to 3D (Geometry Only) New | 0 | Full 3D model, mesh only |
| Image to 3D (Texture + PBR) New | 6 | Full 3D model with PBR materials |
| Extra Relief (over limit, Pro) | 5 | Each generation beyond 5-hour limit |
| Background Creation Texture (Remove Plane) | 2 | AI-generated texture for the cut plane background area |
Purchasing Credits
Click the credits display in the toolbar to open the purchase dialog. Credits are available in packages - larger packages offer better value per credit. All payments are processed securely through Stripe. Regional pricing is applied automatically.
License Tiers
- Pro - All features including Depth View, Frame, Depth Optimization, AI Enhancer, Ultra quality. 5 generations/5h with credit extras.
- Hobby - Core features. 3 generations/5h. Some tools require Pro.
- Demo / Expired - 2 generations/24h. Exports include watermark.
 Troubleshooting
Generation stuck at 85%?
Normal. The final stage (mesh building, normals, optimization) is the most intensive. Complex images can take 1-3 minutes. Don't close the application.
"Image processing was blocked"
Content moderation can trigger false positives. Try: cropping the image, adjusting brightness, or using a different angle.
Relief looks flat
Increase Depth Scale (6-10), increase Details Scale (70-90), use Enhance Image first, or try AI Relief Enhancer.
Background appearing in relief
Use Remove Background during model creation, increase Z Limit, or use the Crop Tool / Crop With Offset.
Sharp spikes or artifacts
Reduce Details Scale, use Enhance Image first, apply Smooth brush or global Smooth tool, or increase Smoothing settings.
STL won't print / slicer errors
Enable "Close Bottom (Make Solid)" in export. Run Fill Holes. Don't use aggressive polygon reduction.
Image to 3D takes long
Normal - approximately 7 minutes for high-quality generation. Results are cached for instant reuse.
High memory usage
Ultra quality needs 7.5GB+ RAM. High needs 5.5GB+. Standard needs 3.5GB+. Close other apps. Don't keep too many objects in one scene.
Sculpting feels laggy
Reduce brush size. Lower mesh resolution via Mesh Resolution dialog. Close other applications.
Supported Languages
VistaSculpt supports 25+ languages (Settings → Language, requires restart):
English, Italian, Spanish, French, German, Chinese (Simplified), Japanese, Russian, Portuguese, Arabic, Hindi, Bengali, Punjabi, Marathi, Telugu, Turkish, Korean, Vietnamese, Tamil, Urdu, Malay, Persian (Farsi), Swahili, and more.